If you are reading this, I will assume that you know what rooting is and that you know the advantages and risks of rooting. So, I will spare you the trouble of bearing with my words of advice on this topic. I will straight away tell you how to root the MEmu Player emulator in two minutes using a simple method.
Rooting the Latest MEmu Player

If you have the latest MEmu Android emulator, that is, MEmu 7, don’t even have to bother about rooting it. It comes pre-rooted. Yes! You read it right.
You don’t have to take my words for it. Just follow the steps mentioned below to check the root status:
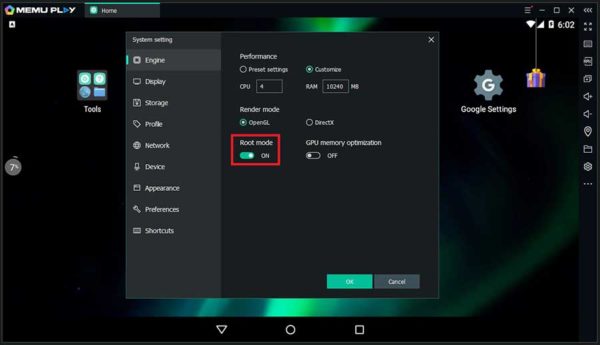
- Launch MEmu Player and open the Settings window. You can open the Settings window by clicking on the cog icon that you see on the panel on the extreme right side of the player. Alternately, you can open the Settings window by clicking on the hamburger menu on the top and then click on Settings in the context menu.
- In the Settings window, the default tab selected in Engine. On the right side, you can see the option Root Mode. It is turned on by default. In case it not turned on, just flip it on, save and restart MEmu.
Voila! Your MEmu Player is now rooted. Enjoy!
- Fix Memu Stuck at 99
Rooting the Older MEmu Players
In case you don’t have the latest MEmu Player, the root option will not be there. So, you have to manually root the emulator. Here are the steps involved:
- Download the KingRoot APK from the XDA forum. In case you don’t want to go and search for the APK, here is the link that will save some time for you. In case your antivirus program is deleting the APK file as a potential threat, simply turn off the antivirus for some time and then download the file. Carry on with the rest of the steps before you turn your antivirus program on.
- Double-click the downloaded file. MEmu will show a popup, alerting you about the installation of the APK file. Ignore the warning and install it anyway.
- Once the installation is completed, open MEmu and finds the KingRoot app. You will see a button that reads, ‘Try to Root.’ Click on it.
- Now, wait. MEmu may restart several times and that is okay! KingRoot is working fine and there is no problem with your MEmu emulator as well.
- Upon successful rooting, you will see a message on MEmu stating that rooting was successful.
Verify that MEmu is Rooted
Just to ensure that you did not receive any false positive, you need to verify that MEmu has indeed been rooted. For the verification process, follow the steps below:
- Launch MEmu. Install the app named Root Checker from the Google Play Store.
- Open the app and check the root status under the Verify Root tab. If MEmu has been rooted properly, you will see the ‘Congratulation’ message right on the top of the Verify Root tab page.
That’s all! You can now uninstall the Root Checker. However, ensure that you do not uninstall KingRoot. Removing the application will also revoke the root access.
Conclusion about Root Memu Emulator Guide.
I will suggest that you use the latest MEmu Player. Since the root option comes bundled with it, you will not be running into a risk of corrupting your MEmu player while rooting.