Is Bluestacks running slow? Is BlueStacks lagging? You are not alone! There are hundreds and thousands of people worldwide who complain about the same problem time and again. This Steps by step guide will show you how to make BlueStacks faster.
Steps to Make Bluestacks Run Faster
I will show you different methods that you can use to fix the bluestacks low-performance issue. These below-given setting will make your Bluestacks run faster than before. So, without further ado, let us begin.
1. Adjust Display Settings in BlueStacks
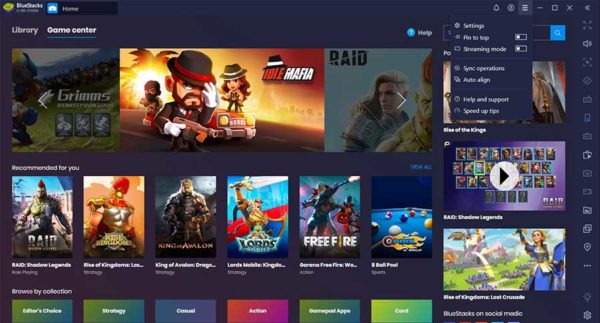
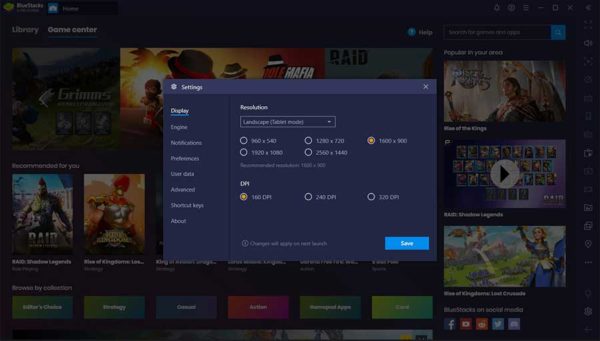
The first thing that you can do is to adjust the display settings of BlueStacks. Using a very high display resolution will slow down the performance. If you had already increased the screen resolution, you must scale down the display settings to the recommended settings.
To fiddle with the display settings, follow the steps mentioned below:
- Launch BlueStacks and on the initial screen, find the hamburger menu icon on the top title bar and click on it.
- In the menu that opens up, click on the Settings option to open the settings window.
- The Display tab will already be selected. Choose the recommended 1600×900 resolution.
- In the DPI segment, select the 160 DPI option.
Now save and exit BlueStacks and relaunch it. BlueStacks should now run without any lag.
2. Optimizing and Fixing Engine Settings
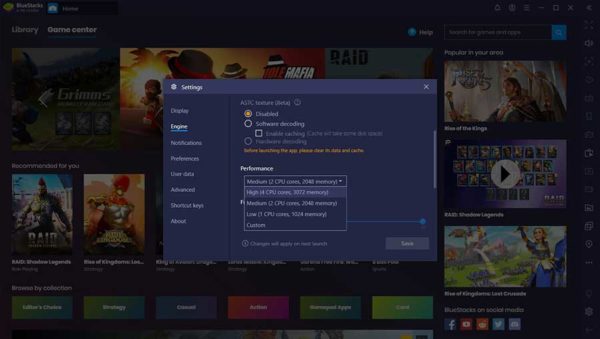
When you are using BlueStacks for playing high-end games like PUBG Mobile and Call of Duty-Mobile on your PC, you need to ensure that all system resources are allocated to BlueStacks.
That’s logical, don’t you think so? When you are playing, you will go full screen and, in all likelihood, stop using other applications. So, there is no harm in allocating all system resources to BlueStacks. As more RAM and more CPU cores become available for BlueStacks, the lag that you experience will be gone.
You can increase both RAM allocation and CPU cores using the following steps:
- Launch BlueStacks, and when the initial screen shows, click on the hamburger menu icon on the top right-hand corner of the title bar to open the settings menu.
- Click on the Settings option to open the Settings options window. On that Window, click on the Engine option on the left panel.
- On the right panel, scroll down to the option which reads “Performance.” Depending on the number of CPU cores you have available, you will see a pre-selected option, usually half the number of cores present in your computer. The allocated RAM is also shown. Change this value to the maximum available.
- Hit the Save button and restart BlueStacks.
[Note: In older BlueStacks versions (that is, the versions less than BlueStacks 4), you can individually select the number of CPU cores and use a slider to determine the amount of RAM you want to allocate from your available RAM capacity.]
3. Close Unnecessary Third-Party Software
Just in case you don’t know, there are certain third-party apps and software that often keep running in the background even when you think you have already closed all running apps. It is quite often challenging to identify third-party software because they run in the background.
For instance, there are many be instances of Adobe Creative Cloud or Google Crash Handler, etc. Many of these services can be memory hogs that you can free up simply by closing them. To do so, follow the steps below:
- On the taskbar, right-click to open the context menu and locate Task Manager. Click on it.
- When the Task manager window opens, click on the More Details link at the bottom of the Window to pull up the detailed view.
- The Processes tab will be selected by default. You can see all the background processes running along with the CPU usage percentage and Memory usage in MB.
- Locate all the non-essential third-party software processes that you see, and then individual click on them and then click the End Task button at the bottom of the screen. Make sure that you are only selecting non-essential services.
Note that you need to close only the non-essential services. In case you are not sure which one is the non-essential service, don’t close it. Instead, close the Task Manager window and move on to the next few steps:
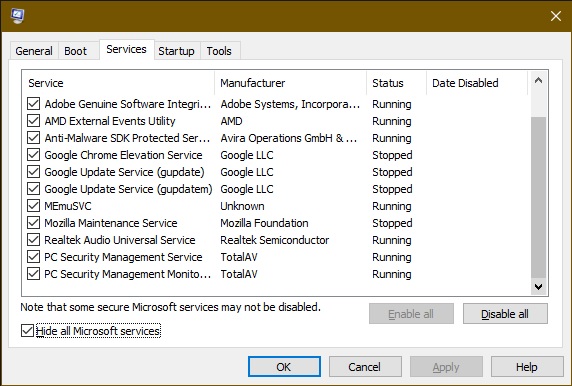
- Click on the search bar or search icon on the taskbar and type in ‘msconfig.’ Hit the enter key.
- Once the system configuration window opens, switch over to the ‘Services’ tab.
- On the ‘Services’ tab, you can see the option of ‘Hide all Microsoft Services.’ Select that option. This will automatically hide every Microsoft Service running on your computer and leave behind a list of all third-party software services running in the background.
- All the third-party services are selected by default. You can hit the Disable All button to end all services that are from third-party vendors. However, doing so will also disable the graphics and audio services.
- To prevent your graphics and audio services from being stopped, deselect every other service leaving the audio and graphics services selected. In the screenshot, you can see the graphics are provided by AMD, while Realtek Semiconductor delivers the audio.
- Once you have deselected every other service except the graphics and sound, click on the Apply button. This will disable all third-party software.
This will close all third-party services running on your computer and release some extra RAM (memory) that BlueStacks can use. This will make BlueStacks faster.
4. Temporarily Disable Antivirus Utility
Please note that this method can be risky if because turning off antivirus utility can expose your computer to various threats, including malware, spyware, etc. If you plan on doing this, make sure that you are turning on the default Windows 10 security features.
How to turn off antivirus utility?
Before you learn how to turn it off, it is necessary that you understand why to turn it off! In case you didn’t know, there are specific antivirus programs like AVG and Avast that make use of hardware-assisted virtualization. This significantly impacts the performance of BlueStacks. Turning off the feature or the entire antivirus program will improve BlueStacks performance.
One way of turning off the feature is to open the main settings window of your antivirus program and locate the feature and un-check it. If you cannot find that option, the next best thing that you can do is to disable the antivirus utility entirely for some time. The steps involved are:
- Locate the system tray icon of the antivirus program and right-click on it. From the context menu, select the disable option. If this option is not available, you can move on to the next steps.
- Click on the search icon or the search bar on the Windows taskbar and type in ‘msconfig.’
- Once the system configuration window opens, switch over to the ‘Services’ tab and select the option which says “Hide all Microsoft Services.” This will leave behind only third-party services, including the antivirus program.
- Uncheck the antivirus option and click on the Apply button. This will disable the antivirus program.
Get the Best Android emulators for Windows 7.
How to turn on Windows 10 Security?
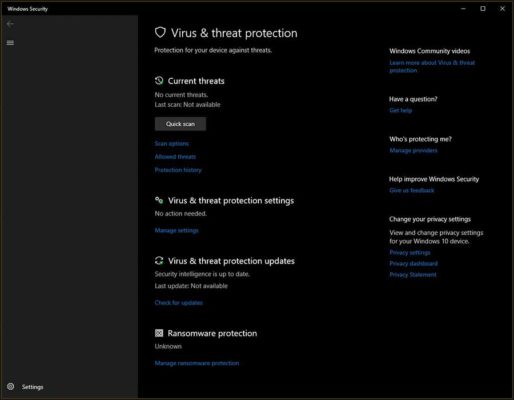
Now that you have turned off the antivirus program make sure that you turn on the Windows 10 built-in security features. To do this, follow the steps mentioned below:
- Click on the search bar or the search icon on the taskbar and type viruses & threat protection and hit enter.
- This will open the virus and threat protection Window.
- Look for the option which reads ‘Virus and threat protection settings.’ Underneath that option, you will find the link ‘Manage setting.’ Click on it to open the next Window and turn on the options available.
5. Update the Graphics Card Driver
Sometimes, the outdated graphics card driver can cause BlueStacks lag. So, try to update the driver. In case you don’t want to manually find the updated driver and then install it, you can always use a third-party application like Driver Booster 6 to scan for outdated drivers.
You can use a free version of the application. The free version will tell you the list of drivers that are outdated. However, it may not automatically download the drivers for your computer.
Nonetheless, it is still helpful because you can get the driver’s name and use it for a quick search on your graphics card vendor site to locate the latest version of the graphics driver once you find the driver, download and install it.
There is no reason for you to think that Windows 10 updates will download and install the latest drivers. Windows repositories of drivers may not have the latest drivers. So, it is always a good idea to get the latest drivers directly from the vendors.
Conclusion
Making BlueStacks a tad faster is not really that difficult. However, you need to understand that if BlueStacks is lagging, there may be many reasons. One of them may be that you are using an outdated version of BlueStacks.
The other reason may be that your system doesn’t have enough resources or has only the minimum required resources for running BlueStacks but doesn’t have the recommended resources. Upgrading your system hardware might be the only solution in case your computer resources are not adequate.